Wednesday, May 28, 2014

Happy Fathers Day!

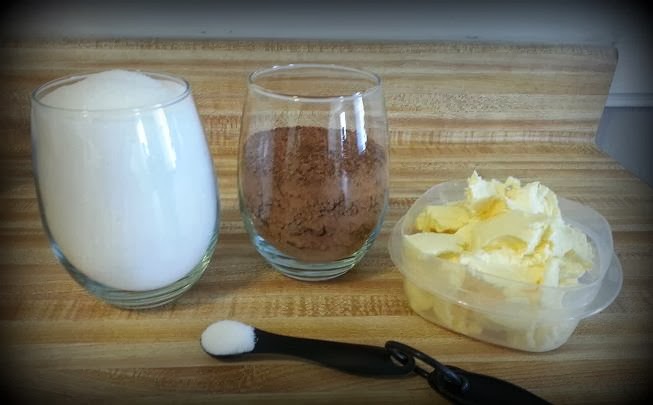
You might want to book mark this post in my blog for future reference...it's a Fathers Day edition! You know all dads out there want to indulge just like moms do on Mothers Day :) So take note of this recipe! It's sooo mouth watering good. It's a recipe for fudge brownies I found a while back, but can't remember where I found it. 

Fudge Brownies

Preheat the oven to 300 degrees, and then combine the following in a mixing bowl

4 eggs
1c sugar
1c brown sugar
1/2c flour
1 1/4c cocoa
8oz melted butter
2tsp vanilla extract
1/2tsp salt

Mix it all together and put it in your brownie pan. Bake for 45-50 minutes. 

I swear these are the best brownies I've ever had. Can definitely guarantee you won't have a bad brownie with this recipe. I haven't!

Now, for all you crafty crochet-ers, check out this pattern. It's great to make for you, your kids and the father in their lives to take goofy pictures with!
This is what it looks like! (I did not make this one, the creator of the pattern did). And the other pattern you can add bushy eyebrows, too! I love how cute and silly these are. I can't wait to make these for us :)

It doesn't matter if you go out or stay in with your dad on Fathers Day, just have fun! And don't forget, Fathers Day is June 15!

~Namaste~

Sunday, May 18, 2014

Homemade calzones have never been easier!

So a couple weeks ago I was craving a calzone. My husband and I had had one recently, but it was just so good. So I found a whole wheat pizza dough recipe that was so quick and simple, it was only 4 ingredients! You can find it here. It's so easy to roll out, just make sure to add a tiny bit of flour at a time while rolling. don't want it too dry. The first time I made these, I made 3. They were 2-3 meals a piece! They were HUGE. This time however, I figured I'd go smaller, and just freeze a bunch. Some I made with ricotta as a base, others tomato sauce. You can put 3-6 on a baking sheet for 20 minutes and the dough will be so good. These are how mine turned out.
This is one made with ricotta..

in the process of folding them..

one made with tomato sauce..

seasoned with a little butter, garlic and italian seasoning right before popping them in..

and this is the finished product! I think it made 11 total, but I didnt follow the recipe as far as how small to make them. I also made the recipe 1 1/2x the amount.

I was almost done when I realized I forgot to take a picture of the inside! 

I made a lot of food, and had a lot of dough to work with, but it took about an hour-hour and a half to make and bake them all :)

Share this recipe with your friends and family, or better yet, try your hand at them and share!

~Namaste~

Saturday, May 10, 2014

Everything just keeps getting better and better..

I keep telling you guys that I'll be better at updating posts and showing you all of my new creations. The sad thing is, I'm only getting busier. There are so many weddings and birthdays in the next 3 months alone, on top of moving again, etc, etc. It's frustrating, stressful and I can barely keep my mind in shape. But I'm here now, so end mini rant. 

I recently had a Mothers Day Contest on my facebook page, Stitches and Weaves and Other Things, doing a simple trivia question, and had a grand prize, 1st and 2nd runner up. The grand prize winner received this bag that I crafted up. It was actually my first time lining anything crocheted, and it turned out really nice!


I forgot to take pictures of the 1st and 2nd runner up prizes, but I'll get one from them! I'm in the process of making a bigger purse for my mom for Mothers Day, so once that's done, I'll be putting both of these up for sale in my Etsy Shop :]

I also came across an AMAZING recipe for whole wheat dough for making calzones. It's this recipe, but I REALLY stuffed them. I made 3 out of all the dough, and it was basically 2-3 separate meals for each person. It was a lot. But delicious. This is what mine looked like. 

These were small plates, too. And the next day, just before heating up. But see? They're massive and that's only half of it. The recipe calls for 18 small ones, and now I see why. But the dough is so perfect. I also baked all 3 at once for 20 minutes. 

In other news, look what I got this morning! 
My business officially has it's own brand! I present to you, Stitches and Weaves and Other Things new label, Lucky Penny :D

My daughters name is Penelope, and since day one, I've called her my Lucky Penny. I've gotten more orders recently, and I'm promoting my business more, so I thought- why not put my own name on it? Or rather, my daughters? I make a lot of baby items, both sewn and crocheted, and I'm having a hard time deciding if just my baby items should have this label, or all of my work. What do you think? This is the first time I've ever ordered these, and so far I'm impressed. It was only $11.95 for 50 tags! That was the best price I found, and I looked for a couple hours. 


Hopefully I'll be able to update more, I'll try to make more time for everyone :). 

Wednesday, April 2, 2014

The cutest little things for a new baby!

So I found a new pattern, and made one of my own for these next crochet creations. A diaper cover and pacifier clips!


I made a little hat with the diaper cover, but the creator had asked it not be sold, distributed, pattern stolen, etc. So, I'm only showing the diaper cover, because I'm allowed to do what I want with permission! The Paci-clip I made was actually pretty simple. It takes hardly any time at all, too, which is nice. I just added these little creations to my Etsy Shop, so go take a look! My next project is kind of a secret. I just made a list of some things I have to pick up later, but I'm making it for someone who means a lot to me. He has no idea it's coming to him :D

Just wanted to keep you all updated, of course, and check back weekly for new blogs!

~Namaste~


Tuesday, March 18, 2014

More Crochet Creations!!

So ladies and gents, I've got more creations to show off! 

These little creations^^ I made for a friends cat! They're super cute and he actually doesn't mind them :]


This one I made because well, it was winter. But can easily be worn as a headband. It can be made thinner for just that.


The flower can also be made smaller if you decide you like that, or not having one at all!


The little buttons in the back that are used to keep it closed, is very easy to button and unbutton. Nothing gets tangled!


This bag/purse was made for my sister in law. It's all very stretchy and the strap is very flexible, so there's no heavy weight on your shoulder.


I'll be having more up soon, I hope! Anyone interested in making any of these, feel free to message me for the patterns! The bow ties are especially easy to make-took maybe a half hour for those 4!

~Namaste~

Thursday, March 13, 2014

Procrastinator, no more!

So if it's not bad enough I leave every one of you hanging for however long it was I was gone, I haven't lost any weight.

Why?

I'M SO LAZY. No joke. I can't believe how lazy I was.  This is the week my life is changing and I'm not taking no from myself as an answer anymore. I just can't deal with looking at myself in the mirror anymore, I'm just done. So here's what's new with me. I cancelled my gym membership. 

WHAT?! But why? I thought you wanted to work out and lose the baby weight?, you might ask.

Yes, that's exactly what I want to do. But this time I'm taking it in my own hands and really pushing the pedal forward. I'm just so over this whole lazy thing, I don't know how to explain it to you guys. Plus, it's really hard to get to the gym during the day when you're a stay at home mom and only have one car.

This week I've started the T25 Focus workout plan. Now before I continue, let me say this. If you procrastinate, seriously stop. That's enough. If I could, I'd slap your hand like a child. Let me be completely honest with you. This is embarrassing to me and you'll probably think "Ugh, seriously?", but yes. Seriously. My current weight is 212 and like most women at whatever age, I have cellulite. Yay me! I also have bingo arms, thighs that are too big for anyone, and an ass that...well, probably would grow another ass if I kept going the way I was. 

So this workout is supposed to last for 10 weeks. I can do that. As of right now, it ends the week before my birthday! So I'm super excited for that. But I'm also adding Leslie Sansone's walk at home videos as well. I plan on doing the T25 Monday thru Friday anytime before noon and the walking anytime at night, probably after dinner. I'll walk though, 6 days a week, rather than 5 like the intense workouts. Now with this, I don't plan on following any particular diet, but rather making a simple one of my own. I'm setting a strict 1200 calorie diet and by strict, I mean STRICT. And nothing but water. That one might be a little hard considering I've got a sweet tooth large enough to fill the grand canyon and could drink soda just about all the time. Well, that and sugar and mocha in my coffee..you will be missed. With this 1200 calorie diet, I'm not planning on being a complete herbivore a yada yada. I still plan on eating healthy, but if you do this 100% of the time, you'll crash real fast.. so 90% clean eating and 10% fun food. But, I plan on keeping that inside my 1200 calorie count, not just a "treat" for myself. Just to give you an idea of what this looks like, here ya go.

MONDAY-FRIDAY
1200 calories
T25 before noon
Walk at Home in the evening

SATURDAY
1200 calories
Walk at Home before noon
Walk at Home in the evening.

It's real simple, but I'm kicking my own ass and getting my own results. I've looked all over the place for 'How to lose x amount of pounds in x amount of days!' and seeing all these scams. So I'm doing these, and I'll provide progress results every couple of weeks, rather than once a month like most do. I'm also taking 2 green tea pill supplements every day as well, to boost my metabolism and really get going. So far so good on that, too!

If you wanna join this with me, please do! I'd really love to see and hear about your progress, too! I WILL look good in my swim suit this year, dammit. I will. And like all good days, ...

~Namaste~

Wednesday, February 12, 2014

A fun twist with hats. And recipes!

So I had a couple requests from a couple of good friends of mine, to make them hats. These are the pictures I get.


I'm glad I could make my friends happy with this sort of thing.

Once again [with these patterns, anyway] I cannot claim them as my own, so this is where you'll find the panda pattern and this is where you'll find the hat and beard patterns.

I know I haven't been keeping up with my blogging lately and I'm sorry..life's got a hold of me! And I just got a big order from my Etsy Shop, so I may not post anything else for about a week or so. I need time to make all of it! Lots of fun hours ahead. I also don't want to leave you guys without something else to enjoy, so here's a couple of really fun recipes!

Thick and Chewy Chocolate Chip Cookies

2cups + 1 tbsp flour
1/2 tsp. baking soda
12 tbsp melted butter
1cup packed brown sugar
1/2cup sugar
1 egg + 1 egg yolk
2tsp. vanilla extract
1 1/2cup semi sweet chocolate chips

Make sure before you preheat your oven to put the rack in the middle and then preheat to 325 degrees.
Combine the flour and baking soda.
By hand (and this is way easier) mix the butter and sugars.
Beat in egg + yolk and vanilla.
Add dry ingredients and chips.
Make 1/4cup dough into balls. 

It should bake for 7-10 minutes. [Every oven is different]
**Personally I made them a little bigger because I was looking for a good recipe for big soft choc. chip cookies. THIS IS IT!!


Garlic knots

For the dough- 1 3/4cup warm water     [Make sure it's warm!!!]
1/4cup olive oil
1tsp. salt
1tbsp. sugar
1 1/2 tbsp active dry yeast
5 1/2 cups unbleached flour

For the garlic coating- 1/8cup olive oil
2tbsp. butter
4 cloves garlic (finely crushed)  [[I used minced garlic in a jar and it worked out great]]
1/4cup italian seasoning

Preheat your oven to 400 degrees.
Combine water, olive oil, salt, sugar and yeast. Mix.
Add flour. Mix. Set in a warm spot [like on top of the preheating stove] until doubled in volume.
Roll flat to 1/2in by 5in. [[I just grabbed from the ball of dough and rolled it between my hands.]]
While the knots are baking, make garlic coating.
It'll bake for roughly 8-10 minutes.

When you take the knots out of the over, spoon the coating over each knot and you're done!


Homemade Meatballs

1/4cup water
Ground beef [or vegetarian substitute]-1-1 1/2lbs
2 eggs
1/2cup buttermilk
3/4cup unseasoned breadcrumbs
4tsp. garlic & onion minced [[minced garlic in a jar once again and onion powder does fine in a pinch]]
1/2cup parsley
1/2 parmesan
2tbsp oregano
1tsp. salt
1/2 tbsp pepper

Preheat  your oven to 375 degrees.
Whisk eggs.
Add water, buttermilk & bread crumbs.
Stir and let rest for 10 minutes.
Combine bread crumb mixture, garlic/onion, parsley, cheese, oregano, salt & pepper.

Mix and make balls.

Bake for 30 minutes.


Recipes that don't really have much to do with each other, but they're short and sweet and I want to keep my readers entertained! So if you try any of these out this weekend, let me know how it turned out!

~Namaste~

Monday, February 3, 2014

The more and more and more I crochet.

I feel like I haven't been a loyal writer lately! I've been busy with all sorts of stuff, and some of that stuff including crocheting more things! Take a look at the things I've made :]


 The black hat with dark blue strips I made for my husband. It's more slouchy when it's on an actual human :p But with mine I started the blue strip at row 15, doing a hdc instead of dc. So it's hdc, dc, hdc, dc, hdc, dc. No sc's in mine.
 This little sloth and pineapple I made for a little internet community..First amigurumi EVER..and clearly it's amateur, but I enjoyed it ^_^ The leaves I did differently though because they were a pain in my butt, so I'll go ahead and provide that: Ch. 7, in 2nd ch from hook, sc, hdc in next st, dc in next st, 1tc in next 3. That's it! It was wayyy easier than the other for some reason.

I made this panda hat for a friend. Nothing too different about this one :]


And I just made these for tiny little storage devices! The two tan bowls are about 2.5 inches in diameter and used for my buttons and the red ball is just a smidge smaller. I use the red ball for my yarn needles and stitch markers..it works perfectly! Other than these little bowls and ball, all of these patterns I have provided links for :]

Don't forget to check out my Etsy Shop :]

Happy crocheting!

~Namaste~

Tuesday, January 28, 2014

They finally came in! [weight loss blog cont.]

Ok, so if you've been following my blog, you've read the one with my new weight loss goal and the products I was offered for free. I wasn't expecting them until at least Thursday, but the Amazon package was here first thing this morning! Here they are!
 I'm looking up recipes as I'm typing this, too. I'm so excited, I really hope it works!
It's supposed to have a sweet taste-like a light chocolate/molasses mix. If this works the way it claims, I'll be looking completely different before summer even gets here.

Now just to let you guys know, I don't plan on just using this stuff and not planning to exercise or anything. I do. 5-6 days a week twice a day like I had planned. You'd think that alone would be enough, but how many of you adopted the crappiest of crap metabolisms after having a baby? Plus this stuff promotes a healthy digestive tract (track?) and I really need that. Those of you who don't have any kids, you couldn't imagine how much having a baby changes your body. Mine is still recovering and Penny's about to be 7 months :[ That makes me a little sad thinking about it..she's growing too fast!

Ok, change of subject before I dwell on the thought. So I'm about to make some lunch and take my first teaspoon of the Yacon syrup. Wish me luck! I will definitely keep all of you posted. And with my next blog about my (hopeful) progress, I'll fill you in on my measurements, and where I'm trying to be and maybe even slide in a before picture, but we'll see. 

~Namaste~

Sunday, January 26, 2014

My newest crochet creation!

As I promised from last nights blog, here is my latest creation.


I looked and looked so much for just a regular basket pattern I would be OK with making and that would be big enough for all my yarn. Then I saw a pin for hanging baskets and started looking at those. Still, after all of this looking, could not for the life of me find a pattern big enough for all of my yarn. I'm talking, size 3 diaper 144 counts diaper box overfilled with skeins of yarn. So I found one that by the looks of the picture looked big enough, and by the time I got to where it told me to pretty much start bringing it in, it was going to maybe hold 2 small balls of yarn. Nope. I'm done. I'm just gonna wing it and go with the flow! So I made up my own pattern that took me what seemed like forever, but turned out great! I'll just have to make a few more for the rest of it haha. 

**The one thing I ask of you-you can make this product for yourself or a friend, but please do not claim this as your own or sell the finished product. I worked really hard on this and am too proud of my work to let someone else call it their own. Thank you for understanding :]


And now to move on to my FREE pattern! I want to make sure before you start you know what you're getting yourself into. This took me probably about 12-16 hours TOTAL, not in one sitting. You'll need lots of time and of course patience. Trust me, it's worth it in the end!


So you have a better understanding about how big this will be, the dimensions are 14" in length and 18" wide. And very stretchy.
I used [almost] a whole skein of white yarn and a bluish turquoise.
11mm hook
Stitch markers

*Note: I worked in a spiral. Much easier than joining every row. 

Round 1- Ch 2. 6 sc in 2nd ch. (6)
Round 2- 2sc each st (12)
Round 3- 1sc in next st, 2sc in next. Cont. around (18)
Round 4- 1sc in next 2 st, 2sc in next. Cont. around (24)
Round 5- sc in next 3 st, 2sc in next. Cont. around (30)
Round 6- sc in next 4 sts, 2sc in next. Cont. around (36)
Round 7- sc in next 5 sts, 2sc in next. Cont. around (42)
Round 8- sc in next 6 sts, 2sc in next. Cont. around (48)
Round 9- sc in next 7 sts, 2sc in next. Cont. around (54)
Round 10- sc in next 8 sts, 2sc in next. Cont. around (60)
Round 11- sc in next 9 sts, 2sc in next. Cont. around (66)
Round 12- sc in next 10 sts, 2sc in next. Cont. around (72)
Round 13- sc in next 11 sts, 2sc in next. Cont. around (78)
Round 14- sc in next 12 sts, 2sc in next. Cont. around (84)
Round 15- sc in next 13 sts, 2sc in next. Cont. around (90)
Round 16- sc in next 14 sts, 2sc in next. Cont. around (96)
Round 17- sc in next 15 sts, 2sc in next. Cont. around (102)
Round 18- sc in next 16 sts, 2sc in next. Cont. around (108)
Round 19- sc in next 17 sts, 2sc in next. Cont. around (114)
Round 20- sc in next 18 sts, 2sc in next. Cont. around (120)

I know this seems like a lot, but trust me, this is just the base. We're just getting started.

Rounds 21-43- sc all the way around (120)

That should be the long haul. Now get yourself excited and give it all you've got because this is it! We're heading towards the end!

Read this before you start on the following rounds. I didn't have a stitch marker (still waiting on them to come in) so I'm sure I lost count a few times, and I didn't count these stitches around. Gives you a little wiggle room, too.
Round 44- sc in next 6 sts, sc2tog. All the way around
Rounds 45-46- sc all the way around
Round 47- sc in next 5 sts, sc2tog. All the way around.
Rounds 48-49- sc all the way around
Round 50- sc in next 4 sts, sc2tog. All the way around. 
Rounds 51-52- sc all the way around
Round 53- sc in next 3 sts, sc2tog. All the way around.
Rounds 54-55- sc all the way around

Now by the time I got to the last round, it was just one single row of the turquoise color.

For the strap:
Ch. 6. Sc in 2nd ch from hook and down (5)
sc2tog in next space (like you would be starting a ribbing pattern look)
Ch. 9, sc in 2nd from the hook and down (8)
Sl st up previous strip and connect together.

I also rolled the skeins into balls so it would look better. That took forever as well. lol.

And voila! I hope you enjoy this pattern and it was easy enough to follow. If you have any questions, don't hesitate to ask!

~Namaste~

Saturday, January 25, 2014

New Hair and Weight Loss goals!

There's a couple new things I plan on trying and I just felt like telling all of you about it. One being my hair, two being my weight loss goal. Let's start with the hair. 

So I came across another blog going over using baking soda and vinegar to shampoo and condition my hair. I thought about it for a few days and finally decided to give it a try. Tonight was my first time trying it out and I can honestly say I feel like my ends are much smoother than before; almost like my hair has been repaired, but there was no damage to begin with. I also found an olive oil treatment that's supposed to make my hair grow faster...we'll see about that one. Here's what I did.

Shampoo::
-1/3 cup baking soda (or more if you need it)
*I put a little in my hair to start distribution, but started at my scalp and worked my way to the ends. Left in on for a couple minutes and rinsed it out. 

Conditioner::
-2 tblsp apple cider vinegar (or white distilled vinegar)
-1 cup of water
*Mixed the two together and worked through my hair, making sure everything was covered. Also left in for a couple minutes before rinsing completely out.

I know some if not most of you are hesitant because of the vinegar smell. The ACV didn't have a strong smell to begin with, and now that my hair is dry, my husband said it feels, looks and smells clean, even though it doesn't have a scent. "Does clean have a scent?" he asked. lol. So in the conditioner you can add essential oils like lavender or peppermint. That's what I'll start doing. Ok, no for the olive oil treatment. This is where I found it. When it was on my head it felt similar to having it colored (it itched a little) but much much tamer. I'm going to keep trying these out and post progress pictures along the way :].


And now for the weight loss goals. 
I thought about it going over the different ways I'll be able to lose weight faster and more efficiently. Yesterday while browsing Craigslist I came across this ad and decided to reply. It explains about the Yacon root and how it works and yada yada. Supposedly you're supposed to lose a good amount of weight in a short amount of time. This is what it is. So when I replied about it, they reply back with that Amazon link and 2 more links for 2 other products saying that if I just wanted the Yacon syrup, I would just have to pay shipping, but if I got that and one of the other products, clicked on free shipping and entered the promo code given, it would all be free. And it was! Take a look below.

This was the other product I got, claiming the same kind of weight loss goal. Should get this all by thursday of this week. I'm excited to try it, I feel like I did a fair amount of research on it to go through with it. If you want to try it too, go to the link I provided for the Craigslist ad and do the same thing! 

I'm also planning on doing a 100 day challenge for myself. Every Thursday I have off, for two reasons. 1) My husband has band practice right after work and won't really have time during the day ((or find a sitter quickly)) and 2) because you should always take at least one day off from exercise. And for the 6 days I am, I will be doing so twice daily. I have a strong goal that I'm looking forward to. So Friday's, Sunday's and Tuesday's  when I go in the mornings, I'll do a cardio circuit training for a half hour, and then walk for about 30 minutes. The night when I go back, I'll just do one hour of cardio. Saturday's Monday's and Wednesday's I plan on doing one hour of cardio, twice daily. On top of all this, I'm setting a 1200 caloric diet for myself as well. I'm setting the standards high and goals in front of my face so I don't give up. 

Wanna give this a try with me? I'll update every week or couple of weeks to let you guys know what my progress is and also to let you know how one of those weight loss supplements work for me. I'd love to hear about your success, too!

~Namaste~


Monday, January 20, 2014

I'm back with a brand new recipe!

So today I started my new schedule getting up earlier, getting things done earlier in the day, so I can just relax later with my daughter. Husband left to go into work an hour early to get stuff moved around there, only to be graced with his presence 2 hours later because the floors that were being done, were still not done. So basically I've been lazy almost all day.

I wanted to try a new chocolate recipe, as my cravings have been kicking in pretty fiercely lately and I wanted to share it with all of you! Now keep in mind that I doubled this recipe to make brownie cupcakes rather than just brownies. So the timing for cooking is going to be different. You can find it at this site and follow it there if you get confused with something on here or would just prefer to do it that way.

So here goes!

-20 tbsp unsalted butter
-2 1/2 cups granulated sugar
-1 1/2 cup + 4 tbsp unsweetened cocoa powder
-1/2 rounded tsp kosher salt
-2 tsp vanilla extract
-4 large eggs
-1 cup all purpose (unbleached) flour
Preheat your oven to 325 degrees!

Now keep in mind that all of that ^^ is doubled from the original.

                                          So first you want to gather all ingredients together.


For now you're only going to combine butter, sugar, cocoa powder and the salt in a medium heat-safe bowl.


**Note:: I didn't do this next part, I just melted the butter and mixed it in.

Add enough water to a medium pot so that it's 1 or 2 inches deep and heat until it's barely simmering. Now take the bowl with the ingredients you just combined and rest it over the simmering water. If the bowl touches the water, pour some out. You're going to stir until the butter is melted and everything else is pretty warm. Once this happens, take the bowl off and let it sit for 3-5 minutes. 
Don't be worried if the mixture looks grainy like this


Stir in the vanilla, one egg at a time, and then finally the flour, slowly. 

So this is where instead of putting this mixture in a greased brownie pan or on parchment paper, I decided to go with cupcakes! I had some wrappers I didn't think I'd ever get around to using, so I figured it'd be a good way :)

I can't stress this enough-this is for a doubled batch!! I don't want you to be disappointed with the outcome because I didn't clarify anything.

And this is what my batch looks like! I filled each cup just short of the top and baked these for a total of 45 minutes on 325, checking throughout.

**EDIT** If you're afraid of the top being too crispy, cover the top with aluminum foil for the majority of the baking time.

**Note::It was my first time trying this recipe. After trying one of these out, I will let you know that the top is pretty crunchy while the inside is wayyy softer and melt in your mouth. Also, regardless if you put this in a pan with or without a liner, or make cupcakes with or without liners, spray with cooking spray! Or a non stick spray. I had aluminum and paper cupcake wrappers and the paper ones seem to stick a bit too much for anyone's liking. 

Try it out and let me know what you think!


Wednesday, January 15, 2014

The perfect chili for a cold day :)

So today was a colder day than it had been in the last week or so, and I decided a big pot of chili would be perfect. I found a simple recipe on the McCormick website and made it my own. I can't remember which one it was (I'm pretty sure it was the american chili recipe) and followed it...a little. It said it would make for 5, 1cup servings. I decided, nah, we're broke and low on groceries, I'll make a big pot. What I didn't realize was how amazing it would turn out. This is how I made it.

In a big, tall standing pot, I mixed:

-1 box of mini (cooked, of course)
-roughly 2 pounds of lean hamburger (or turkey, or meat of your choice. And cooked.)
-5 tsp. of cumin
-3 cans of dark red kidney beans (mostly drained)
-3 cans of Hunt's diced tomatoes (28oz cans)
[The following spices I didn't measure, I just added as I saw fit. Add as much or as little as you want.]
-Italian seasoning
-Cayenne pepper (I didn't realize we didn't have chili powder)
-Onion powder
-Basil
-Garlic salt

I cooked this between a low and medium heat for roughly 30 minutes, mixing throughout. The amount of spice in there was absolutely. perfect. The cayenne pepper blended so perfectly I couldn't believe I had done so well. Especially with an upset stomach and headache from being sick since last Thursday.

Anyways, here's what my pot looked like, (3 bowls in) I just wish you could smell this, too.


And that's still half full! This will cover the next at least weeks worth of meals. I'm so glad I decided to do this. My husband really loved it, which of course made me happy. He told me not to give too much away so he can eat it, haha. If you try this out, let me know how you like it! I love hearing feedback from people trying out/using my ideas. It makes me happy to make other people happy.

I hope you all have a warm, good rest of your week!
~Namaste~

Friday, January 10, 2014

Starting with a bang!

I had/have no set new years resolution this year. I've decided to go where the universe wants to take me. And apparently it's a crafty little planet set up in our living room. So these blogs will be about everything that I do as a stay at home mom, a crafter, crocheter, seamstress, and recipes I create. To start off I'm going to list my crafty Facebook page, Twitter and Etsy shop. 


Feel free to share any and all links with friends, family or fellow crafters. That's a big reason I started all of this, on top of the fact that my daughter has changed me into a mixture of Betty Crocker and Suzy Homemaker. So as I was saying, just doing a simple search for a beginner pattern is all it takes. I can't believe how addicted to this I've got. I love making things for my daughter, husband, other family members and friends. Actually it all started before I had my daughter while still pregnant, I started making baby slings and pouches to sell. My next step in Crochet World, amigurumi. They look like this:


It can simply be anything. Mostly cute, but can be anything. I'll always have new things up, seeing how I'm always keeping my hands busy. 


Keep in mind on my Facebook and Twitter page I'll start posting random contests and giveaways! So let anyone whos interested know. Share the crap out of my links. I've made a few loyal customers in a very short time, and I'll be more than happy to see that keep growing! 

Well, this is it for the beginning of a new chapter of my life. 
~Namaste~